
The Earthworm Farm
by Ronnie Ugulano
A few years before we started keeping worms ourselves, I saw an article in the paper about the guy who composted practically every sort of household garbage his family generated by means of earthworms. I was intrigued. At the time, I didn't think in terms of keeping worms myself, but using earthworms to compost mundane biodegradable household garbage made a lot of sense.
Later, during one of our weekly library visits, I came across a book on raising earthworms. I read that book, and a few others on the topic many times, and as I did so, it occurred to me that they would be a pretty interesting science project for school as well, so, after making a trip to the local bait shop for a couple of hundred worms, we began. Below I'll detail how we went about making our earthworm farm, and how you can raise your own earthworms.
The first thing I learned, was that any worms picked off of the sidewalk won't do, because there are many kinds of earthworms, and they can be very different. Some worms make burrows and don't like to be disturbed. Other worms don't reproduce very quickly, and others actually smell bad. The only things all these worms have in common is that they all hate dry conditions, and they prefer an environment leaning towards alkaline pH.
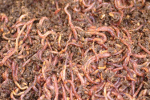
So, if you want to raise earthworms in any kind of numbers, you want Red Wigglers. They are practically domesticated. These worms multiply fast, and they need to have a constant food supply in order to thrive. Since this is the case, they are more likely to stay put near where they expect dinner to show up, even if they are not in a bucket, but an outdoor compost pile. You can buy these Red Wigglers in pet stores, and bait shops. These worms will be full grown, at about 3 inches long. If you buy your worms this way, get at least a couple of hundred worms, but buying by the pound is cheaper.
You can find ads in magazines such as Field and Stream or ads on Craigslist for worms that you can buy in bulk by the pound, and if you have access to this option, you can build your herd much faster. These worms will be in various sizes, from tiny little threads to full grown.
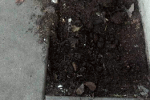
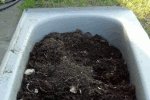
In order to make a home for your earthworms, you need a medium for them to swim in. There are a couple of choices here. The hardcore gurus use Canadian Peat Moss, which you can get at hardware stores. Peat Moss is lightweight, making it easy for the worms to swim around, but costs money, and has very little food value to the worms. Shredded cardboard, paper, or leaves is popular as well. My favorite is sawdust, or stove pellets. Or, you can use plain dirt, which is cheap, has some food value, and is very forgiving towards new worm wranchers, but weighs more, and is a little more difficult to deal with. However, any combination of the foregoing will work. Mix your chosen bedding with about 25-50% manure. Add enough water to the combination so that it's moist but not soggy. Set this mixture aside for about 2 weeks. During this time, your compost will probably heat up to a temperature that would kill the worms if you put them in before the 2 weeks is up. After 2 weeks, add your worms, and allow them to work their way into the bedding. If you do not use manure, you do not need to wait 2 weeks, and you can add your worms right away.
From this time, you can begin to add kitchen garbage. Figure that the worms can almost eat their weight in kitchen leavings each day. Avoid putting more in there than they can clean up in a day or two. If you do, the worm bin will become acid and sour smelling, and it will kill the worms. The more worms you start out with, the more kitchen garbage they can handle.
What do worms eat? They have a wide diet range. Vegetable parings, egg shells, paper, grass clippings & leaves, or as one long time earthworm farmer said, 'Anything that has lived and died'. A weekly handful of finely ground cornmeal gives them additional nutrients for them to multiply quickly. I have a vegetable juicer, and the leavings from it make a regular contribution to my worms. If you are raising rabbits, hamsters, pet rats, goats or sheep, their manure and used bedding is 4 star worm food. Raising earthworms along with smaller animals makes good sense, because the worms will answer the question: "What do I do with all that manure?", making your job easier.
On the whole, earthworms are easy pets to keep. They don't make much of a mess, and they don't bark and keep you up at night. It takes just a little bit of effort to keep them happy. First of all, keep the bedding moist but not soggy at all times. Dry bedding will kill them. Earthworms breathe through their sides, and their skin must be moist in order to take in oxygen. Next, make sure that their bins do not become acid. You can tell by the smell. A healthy worm bin will smell like fresh turned earth. An acid worm bin will smell very sharp and sour. Avoid being too generous with their food, especially in the early days when your population is small. Gently turning the bedding in the bins/piles about once a month or so, makes it possible to check on their condition and admire their population growth.
There's no guarantee, but given ideal conditions, redworms can double their population every 3 months. At some point, you will want to divide them up, either by distributing the compost and earthworms in your garden or flower bed, or by starting another bin.
When you are ready to start a second bin, or use the compost you've been making, so you'll want to separate the worms from the compost. There are several ways to do this. One of the easiest ways is by scooping the compost and worms onto a board or table in the light or sun. Pile up the compost to make a pointed pile. Let the pile sit for about 15 minutes and then gently scoop off the point of the pile. You should have just compost, no worms in what you have scooped off. Reshape your pile again, making a point, and wait another 15 minutes. Scoop off the point again, removing the compost. Keep doing this until you have almost entirely worms only in the pile. Then the worms will be easy to sort through and divide. Once divided, you can use the compost in your garden, and probably still have more worms than you originally started with, to continue on. If you want to "reinvest" that compost and start another bin with that compost, it will have eggs, tiny babies, and a few missed older worms to start a population in a new bin.
So, what is the point in doing this project? After 20+ years of keeping redworms for composting, I have become aware that they are amazing creatures. Over the years, I have become aware how much we owe to our earthworm friends.
What education can a homeschooling child get out of this? For the very young child, it may be enough to let the child get the feel of the dirt, and watching the worms wiggle. An older child can learn to count, to recognize various bugs that live with the earthworms, how they live together and about reproduction. A still older child can learn about ecology, soil depletion, and the value of composting. In addition, if you choose to make your hobby into a business, you can add a whole new range of skills to the curriculum. On the whole, we found our Earthworm Farm a fun, educational project.
Additional Information:
- Use a rather protected spot out of summer sun and winter wind.
- Keep the pile moist but not soggy. Too much water can encourage fermenting of the food waste, especially in the heat, and most especially if you are using an enclosed container.
- Make sure there's a constant supply of food. Red Wigglers will stay where there's food and will wander off and die if there's not.
- Red worms love corn meal. It also has nutrients that seem to fatten the worms up and make them hard-skinned, something desireable. In addition, corn meal, encourages red worms to reproduce prolifically. So, throw in a handful once in a while.
- Too much food will kill them as much as too much water, because the food will ferment and make the pile acid, so feed conservatively until you see how much they will eat over time.
- If you smell a sharp, acrid smell, stop feeding the worms immediately! Add additional bedding to dilute the food-to-bedding ratio. Take a yard fork and turn the contents of the bin or pile every day for about 2 weeks to let the air help oxydize excess food and to let the ammonia/alcohol escape.
- One sign of overfeeding is Black Soldier Fly Larvae. Technically, Black Soldier Fly Larvae (BSF) will not injure your worms, but they love the acidic enviornment created by overfeeding, and signal that your bedding is becoming unhealthy for the worms. So if you see BSF in your bin/pile, stop feeding for a few days, add some additional bedding, and turn your bin daily for about a week or so.
- Recovering from diaster: Once in a while, it happens - you've overfed for way too long, and your entire bin is acid, or, you've forgotten to water for weeks, the and bedding is all dried out, and nearly all the worms have died. Remember that the worms have left many cocoons behind, and after you've corrected the problem, they will hatch, and you can repopulate.
Other Helpful Sites:
- Worm Composting Article
- My Grandfather's Earthworm Farm
- Friend Earthworm
- Introduction to 'Harnessing the Earthworm'
- Composting Rat Litter

- Black Belt composting: Humanure